Hi there Snaggletoothers! Welcome to Week 3 of the Snaggletooth Make Along, which I am delighted to be running with Scheepjes.

Well, it's been quite a Snaggletooth week! Over 4500 of you have downloaded the free pattern, and lots of you have been kind enough to purchase it, so I thank you ALL for joining in with this wonderful community project. This is my first MAL and you have made me feel very welcome! Yes, this week is about tassels and pompoms BUT before we get to that, there's important business to attend to: I have seen lots of colours flying around as you all discuss your fabulous projects. So it's time to sing your praises and showcase just a few of the Snaggletooth WIPs I have spotted on the socials. And just so you know, every single Snaggletooth being lovingly created out there makes me smile the biggest smile. Please keep on sharing your work! Next week as it's the final week of this MAL I'll be showing you some of the amazing finished Snaggletooths I have spotted already! (But please don't worry or stress that some are finished! This is definitely a project to take at your own pace... it's just that some people caught the Snaggletooth bug big time and couldn't put it down!)💖
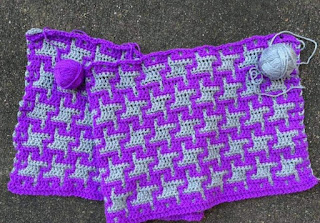
Firstly, how about some sneaky Snaggletooth-at-work loveliness by Fiona @kellyskrochet76 in Chunky Monkey over on IG...
... and check out the border colour she has chosen!! I am LOVING that lime!
Ellie Frances on Facebook... well and truly in team Chunky Monkey, and I cannot wait to see that gorgeous red border go on!
Sunshine Snaggles! These gorgeous happy colours are by Michael @mikescreatievewereld on IG
This beautiful version is by Vickie Lack on Facebook, who is using Our Tribe in shade Felted Button for the Snaggles
Sabrina Krüger on Facebook is using these joyful Colour Crafter shades for her background- Brugge and Wolvega looking fab!
Kristin @_koalacrochet_ on IG has chosen Whirl and Whirlette for her Snaggletooth, this is going to look sublime when it's finished!
Lovely colour changes in Colour Crafter by Julie @pinkfearn on IG
Caroline over at @poppyseedandpom on IG is using the original Snaggletooth pink which is Colour Crafter Hilversum! I LOVE it!
Thank you to everyone for permission to use your pics, I appreciate it 💖
Before we start, here are some useful links if you need to catch up:
If you'd like to participate, you will find lots of help, support and chat over at the Scheepjes Facebook community here:
and
where we will be sharing our work, and chatting about all things Snaggletooth.
The Snaggletooth pattern is available as a paid pattern on Ravelry HERE but I am delighted to offer it to you as a free gift from me to you with the code ScheepjesMAL for the duration of the MAL when you check out on Ravelry. It is also available as a paid pattern only (not free) in my Etsy shop HERE.
...And just so no one misses any Snaggletooth news, here's the itinerary:
PREVIOUS POSTS
UPCOMING POST
Week 4 (13 Oct): Wrapping up the MAL and celebrating your makes!
Anyways, I could literally spend all day gazing upon all your beautiful Snaggletooths but it's time to get on with some work! This week it's all about... Tassels and Pompoms! I know! If you've seen any of my designs before, you may have noticed I have a bit of a penchant for these fun and frivolous adornments...
Images top to bottom: Leafy Throw, Fool's Gold Throw (available on Etsy and Ravelry), YES Throw and Into The Trees Throw (both available in my book Mosaic Crochet Workshop)
As ever, you know this is entirely up to you, whether you want to tassel, or pompom, or neither. It's a personal choice. But I'm going to give you an easy step by step tutorial here, just in case you need a bit of guidance.
First up: HOW TO MAKE A POMPOM
First rule of pompoms, NO-ONE likes a sad, thin, miserly little pompom. No! We are aiming for full-bodied, voluptuous balls of fluffy goodness here.
YOU WILL NEED
A 65mm pompom maker (or size of your choice) or 2 circles of card, cut out of something like a cereal packet.
Yarn of your choice
Sharp scissors
To use the pompom maker, open out both sides of the 'arms'. Then wrap the yarn around each side in turn, until each half is really full and plump.
I aim to just about be able to push the arms back into their places; if they can be pushed in too easily then you probably haven't wrapped enough yarn around.
Push the two arms back to make a circle again, then CAREFULLY cut around the outside edge of all the yarn strands with sharp scissors. Do not open the arms yet!!
Once you have cut around the entire pompom maker, take 2 long lengths of yarn (double stranded is better as it needs to be strong) and tie them around the pompom maker, pulling tight so they slot into the groove which runs around the outside edge. Pull the yarn VERY VERY tight and tie a triple knot to secure. If you don't, your pompom may explode into a yarny cloud of nothingness!
Leave the tying yarn long to fasten the pompom on to your blanket. Carefully open up the two sides of the arms of the pompom maker, then gently pull the two halves apart from the centre, leaving a fluffy pompom.
I like to give the pompom a quick haircut to tidy it up. And there
it is!
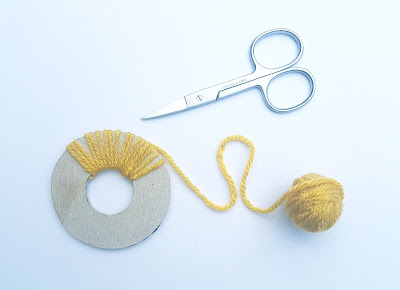
To make a pompom out of cardboard rings, first place them together, then wind the yarn round both rings, through the hole in the centre. You will have to wind smallish balls of yarn to fit through the hole!
Then simply follow all the stages for the pompom maker above from where you start to cut round the yarn, making sure the scissors slide in between the two cardboard rings as a guide. Tie off as before, then finally remove the rings.
HOW TO MAKE A TASSEL
YOU WILL NEED
A piece of card, roughly cut to the length of you finished tassel. For Snaggletooth in Chunky Monkey, my piece of card measured 11cm long (or you could use a book, your mobile phone, anything which is the right length)
Yarn of your choice
Sharp scissors
First, wind the yarn neatly around the card and cut off. For the Chunky Monkey Snaggletooth, I wound the yarn 15 times around the card. Next cut 2 lengths of yarn each 30cm long.
Insert one of the 30cm lengths of yarn under all the loops at the top and knot it securely in the middle to fasten it.
Cut through all the loops along the bottom edge to make the tassels. Don't worry if they are not perfectly even at this point. Now tie the other 30cm length of yarn around all the strands (except the joining yarn at the top), approximately 3cm from the top.
Finally, trim the strands along the bottom edge to get them nice and even.
Now attach the tassels at regular intervals along each short end, using the joining yarn at the top to tie them on securely, before weaving in the joining yarn ends. For my Chunky Monkey throw, I made 26 tassels in total, 13 for each end. They were placed approximately every 9cm along each short edge, roughly every fifth 'dot' in Yarn A on the edging. Make sure you lay them all out to get the placing correct before attaching them.
So there you have it! Two easy ways to add fun and texture to your Snaggletooth loveliness, should you wish to. I hope you have enjoyed my mini photo tutorials this week.
Next week is the final week of this MAL, I am enjoying it so much and hope you are too.
Coming up next time: We'll be taking a look at some more of your fantastic Snaggletooth versions, and I will be showing you a couple more fantastic project ideas... (Watch out, one of them is literally too cute!!!)
See you next week,
Esme x


