Friday, 7 January 2022

2022... If Ever A Year Needed Some Neon Fabulousness, Right?

Hi crafty crochet people! Happy New Year!

Today, it's all about my 2022 Year Panel. It's fun and easy to make and I'm giving you all the pattern for free as a New Year's gift to show my appreciation for this lovely community... You know, this panel could be made into so many things: a cushion cover (as I have done), a wall hanging, a gift for a special person or event this year like a new baby in the world, a wedding, a graduation, or just for someone you want to be with and hope to spend more time with this year. But I bet you have lots more ideas how to use it and I cannot wait to see your beautiful interpretations! You could go with any colours, or change the Yarn B colour (the neon pink colour here) every couple of rows to make stripes, a rainbow effect, anything goes.


You might remember I made one of these for 2020 as it was such a cool number to look at, very pleasing to the eye. Alas, it was a difficult, traumatic and generally testing year for most of us, and of course life is still far from normal. With that in mind, I realised that I've been worrying about this new year 2022, what it has in store for us all, how it will play out. As is usually the case with my mental health, crochet really does steady my mind when it's starting to flip out, so I decided we'd have another go at a Year Panel. In the hope that 2022 is better. Positivity! Optimism!

So, here's the pattern... It uses my preferred method of inset/2-row crochet which is super easy if you haven't tried it before. If you can make a chain, a dc and a tr (UK terms, so that's chain, sc and dc in US terms) then you can do it!

I'll give you the basic technique lowdown, then the pattern will be written out in full, row by row. At the end, you'll find the chart and instructions how to read it if that's your thing.

SO here we go:

2022 YEAR PANEL PATTERN

You will need:

Any yarn to suit you in 2 contrasting colours. I used DK in teal and neon pink.

A crochet hook to suit your gauge: I used a 4mm to make a fairly tight weave as I wanted this to be a cushion cover.

My finished panel measures approx. 50 x 30cm when stretched slightly, so perfect for a 50 x 30cm cushion.

Abbreviations (UK Crochet Terms):

approx: approximately

ch(s: chains(s) or chain stitch(es)

ch-1 sp(s): chain 1 space(s): number denotes number of chains in chain space

ch-sp(s): chain space(s)

dc: double crochet (US sc single crochet)

lp(s): loop(s)

rep: repeat

RS: right side

sp(s): space(s)

st(s): stitch(es)

tr: treble crochet (US dc double crochet)

WS: wrong side

yoh: yarn over hook


Repeats

*......; rep from * to Work the instructions after * and then repeat that section to point indicated.

(........) once/twice/3 times Work the instructions between brackets the total number of times stated.


Special Stitches

cc (change colour): To change colour, work last st of row in old colour to final 2 lps on hook, yoh with new colour and draw new colour through lps on hook to finish. Continue with new colour. Do not fasten off old colour. Leave yarn not in use hanging at side of work, ready to pick up again 2 rows later.

mtr (mosaic treble crochet): work a tr as normal but work it in the skipped st of the same colour 3 rows below, working the st in front of the intervening 2 rows of chains in contrast colour. All mtr are worked on RS of work.


PATTERN NOTES

This pattern uses inset/2-row mosaic crochet techniques:

Change colour (cc) every 2 rows.

The first row of a colour creates the pattern, the second row copies it. Where a dc or an mtr is made in the first row, a dc is made in this st in the second row (make sure to work into all mtr sts from the first row as they can easily be missed). Where a ch-sp is made in the first row, the same ch-sp is made in the second row. 

Work all tr sts into ‘skipped’ sts 3 rows below (referred to as mtr, see Special Stitches). 

To skip one stitch, chain 2. To skip two stitches, chain 3. To skip three stitches, chain 4, and so on. This ‘extra chain’ just stops the work pulling in too much.

Always work into the full stitch as normal, not into the back loop or front loop only. There is another style of mosaic crochet which uses back and front loops only, but not this one!


INSTRUCTIONS:

With Yarn A, ch85.

Row 1: 1dc in second chain from hook and in each ch to end, turn. [84 sts]

Rows 2-10: Ch1 (does not count as st throughout), 1dc in each st to end. Change colour (cc) to Yarn B in final st of Row 10.

Row 11: Ch1, 1dc, ch5, skip 4 sts, 17dc, ch3, skip 2 sts, 17dc, ch6, skip 5 sts, 11dc, ch6, skip 5 sts, 17dc, ch5, skip 4 sts, 1dc, turn.

Row 12: Ch1, 1dc, ch5, skip ch-5 sp, 17dc, ch6, skip ch-6 sp, 11dc, ch6, skip ch-6 sp, 17dc, ch3, skip ch-3 sp, 17dc, ch5, skip ch-5 sp, 1dc, cc to Yarn A, turn.

Row 13: Ch1, 1dc, 4mtr, 17dc, 2mtr, 17dc, 5mtr, 11dc, 5mtr, 17dc, 4mtr, 1dc, turn.

Row 14: Ch1, 1dc in each st to end, cc to Yarn B, turn.

Row 15: Ch1, 1dc, ch5, skip 4 sts, 17dc, ch3, skip 2 sts, 17dc, ch4, skip 3 sts, 15dc, ch4, skip 3 sts, 17dc, ch5, skip 4 sts, 1dc, turn.

Row 16: Ch1, 1dc, ch5, skip ch-5 sp, 17dc, ch4, skip ch-4 sp, 15dc, ch4, skip ch-4 sp, 17dc, ch3, skip ch-3 sp, 17dc, ch5, skip ch-5 sp, 1dc, cc to Yarn A, turn.

Row 17: Ch1, 1dc, 4mtr, 17dc, 2mtr, 17dc, 3mtr, 15dc, 3mtr, 17dc, 4mtr, 1dc, turn.

Row 18: Rep Row 14.

Row 19: Ch1, 1dc, ch5, skip 4 sts, 17dc, (ch3, skip 2 sts, 17dc) 3 times, ch5, skip 4 sts, 1dc, turn.

Row 20: Ch1, 1dc, ch5, skip ch-5 sp, 17dc, (ch3, skip ch-3 sp, 17dc) 3 times, ch5, skip ch-5 sp, 1dc, cc to Yarn A, turn.

Row 21: Ch1, 1dc, 4mtr, 17dc, (2mtr, 17dc) 3 times, 4mtr, 1dc, turn.

Row 22: Rep Row 14.

Row 23: Ch1, 1dc, ch13, skip 12 sts, 8dc, ch12, skip 11 sts, 8dc, ch4, skip 3 sts, 6dc, ch6, skip 5 sts, 6dc, ch11, skip 10 sts, 8dc, ch6, skip 5 sts, 1dc, turn.

Row 24: Ch1, 1dc, ch6, skip ch-6 sp, 8dc, ch11, skip ch-11 sp, 6dc, ch6, skip ch-6 sp, 6dc, ch4, skip ch-4 sp, 8dc, ch12, skip ch-12 sp, 8dc, ch13, skip ch-13 sp, 1dc, cc to Yarn A, turn.

Row 25: Ch1, 1dc, 12mtr, 8dc, 11mtr, 8dc, 3mtr, 6dc, 5mtr, 6dc, 10mtr, 8dc, 5mtr, 1dc, turn.

Row 26: Rep Row 14.

Row 27: Ch1, 1dc, ch11, skip 10 sts, 8dc, ch12, skip 11 sts, 8dc, (ch6, skip 5 sts, 6dc) twice, ch9, skip 8 sts, 8dc, ch8, skip 7 sts, 1dc, turn.

Row 28: Ch1, 1dc, ch8, skip ch-8 sp, 8dc, ch9, skip ch-9 sp, (6dc, ch6, skip ch-6 sp) twice, 8dc, ch12, skip ch-12 sp, 8dc, ch11, skip ch-11 sp, 1dc, cc to Yarn A, turn. 

Row 29: Ch1, 1dc, 10mtr, 8dc, 11mtr, 8dc, (5mtr, 6dc) twice, 8mtr, 8dc, 7mtr, 1dc, turn.

Row 30: Rep Row 14.

Row 31: Ch1, 1dc, ch9, skip 8 sts, 8dc, ch12, skip 11 sts, 8dc, ch8, skip 7 sts, 6dc, ch6, skip 5 sts, 6dc, ch7, skip 6 sts, 8dc, ch10, skip 9 sts, 1dc, turn.

Row 32: Ch1, 1dc, ch10, skip ch-10 sp, 8dc, ch7, skip ch-7 sp, 6dc, ch6, skip ch-6 sp, 6dc, ch8, skip ch-8 sp, 8dc, ch12, skip ch-12 sp, 8dc, ch9, skip ch-9 sp, 1dc, cc to Yarn A, turn.

Row 33: Ch1, 1dc, 8mtr, 8dc, 11mtr, 8dc, 7mtr, 6dc, 5mtr, 6dc, 6mtr, 8dc, 9mtr, 1dc, turn.

Row 34: Rep Row 14.

Row 35: Ch1, 1dc, ch7, skip 6 sts, 8dc, ch12, skip 11 sts, 8dc, ch10, skip 9 sts, 6dc, ch6, skip 5 sts, 6dc, ch5, skip 4 sts, 8dc, ch12, skip 11 sts, 1dc, turn.

Row 36: Ch1, 1dc, ch12, skip ch-12 sp, 8dc, ch5, skip ch-5 sp, 6dc, ch6, skip ch-6 sp, 6dc, ch10, skip ch-10 sp, 8dc, ch12, skip ch-12 sp, 8dc, ch7, skip ch-7 sp, 1dc, cc to Yarn A, turn.

Row 37: Ch1, 1dc, 6mtr, 8dc, 11mtr, 8dc, 9mtr, 6dc, 5mtr, 6dc, 4mtr, 8dc, 11mtr, 1dc, turn.

Row 38: Rep Row 14.

Row 39: Ch1, 1dc, ch5, skip 4 sts, (8dc, ch4, skip 3 sts, 6dc, ch3, skip 2 sts) twice, 6dc, ch6, skip 5 sts, 6dc, ch3, skip 2 sts, 8dc, ch4, skip 3 sts, 6dc, ch5, skip 4 sts, 1dc, turn.

Row 40: Ch1, 1dc, ch5, skip ch-5 sp, 6dc, ch4, skip ch-4 sp, 8dc, ch3, skip ch-3 sp, 6dc, ch6, skip ch-6 sp, 6dc, (ch3, skip ch-3 sp, 6dc, ch4, skip ch-4 sp, 8dc) twice, ch5, skip ch-5 sp, 1dc, cc to Yarn A, turn.

Row 41: Ch1, 1dc, 4mtr, (8dc, 3mtr, 6dc, 2mtr) twice, 6dc, 5mtr, 6dc, 2mtr, 8dc, 3mtr, 6dc, 4mtr, 1dc, turn.

Row 42: Rep Row 14.

Row 43: Ch1, 1dc, ch5, skip 4 sts, (6dc, ch6, skip 5 sts, 6dc, ch3, skip 2 sts) 3 times, 6dc, ch6, skip 5 sts, 6dc, ch5, skip 4 sts, 1dc, turn.

Row 44: Ch1, 1dc, ch5, skip ch-5 sp, 6dc, ch6, skip ch-6 sp, 6dc, (ch3, skip ch-3 sp, 6dc, ch6, skip ch-6 sp, 6dc) 3 times, ch5, skip ch-5, 1dc, cc to Yarn A, turn.

Row 45: Ch1, 1dc, 4mtr, (6dc, 5mtr, 6dc, 2mtr) 3 times, 6dc, 5mtr, 6dc, 4mtr, 1dc, turn.

Row 46: Rep Row 14.

Row 47: Ch1, 1dc, ch5, skip 4 sts, 17dc, (ch3, skip 2 sts, 17dc) 3 times, ch5, skip 4 sts, 1dc, turn.

Row 48: Ch1, 1dc, ch5, skip ch-5 sp, 17dc, (ch3, skip ch-3 sp, 17dc) 3 times, ch5, skip ch-5 sp, 1dc, cc to Yarn A, turn.

Row 49: Ch1, 1dc, 4mtr, 17dc, (2mtr, 17dc) 3 times, 4mtr, 1dc, turn.

Row 50: Rep Row 14.

Row 51: Ch1, 1dc, ch6, skip 5 sts, 15dc, (ch5, skip 4 sts, 15dc) 3 times, ch6, skip 5 sts, 1dc, turn.

Row 52: Ch1, 1dc, ch6, skip ch-6 sp, 15dc, (ch5, skip ch-5 sp, 15dc) 3 times, ch6, skip ch-6 sp, 1dc, cc to Yarn A, turn.

Row 53: Ch1, 1dc, 5mtr, 15dc, (4mtr, 15dc) 3 times, 5mtr, 1dc, turn.

Row 54: Rep Row 14.

Row 55: Ch1, 1dc, ch8, skip 7 sts, 11dc, (ch9, skip 8 sts, 11dc) 3 times, ch8, skip 7 sts, 1dc, turn.

Row 56: Ch1, 1dc, ch8, skip ch-8 sp, 11dc, (ch9, skip ch-9 sp, 11dc) 3 times, ch8, skip ch-8 sp, 1dc, cc to Yarn A, turn. Fasten off Yarn B.

Row 57: Ch1, 1dc, 7mtr, 11dc, (8mtr, 11dc) 3 times, 7mtr, 1dc, turn.

Rows 58-66: Ch1, 1dc in each st to end, turn.

Fasten off Yarn A. Weave in all ends.

You now have a 2022 mosaic crochet panel, ready for whatever purpose you like. I hope you've enjoyed this pattern, if you'd like to share your beautiful versions just use #2022mosaiccrochet on the socials. It might inspire someone else to give it a try.


Here's the chart if you need it:
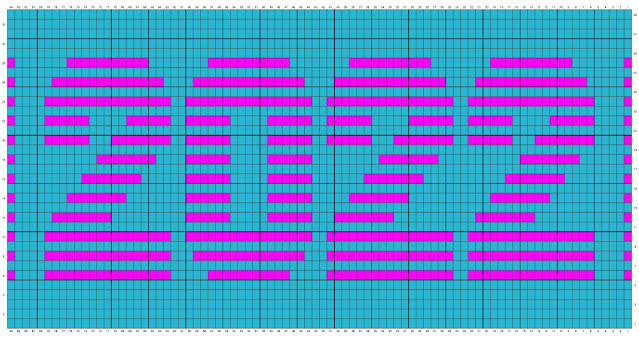

Read the chart from bottom to top. Read the chart from right to left for the first row of a colour, then from left to right for the second row of the same colour. Note that this design is not symmetrical.

Each row of the chart represents TWO rows of crochet in the same colour. The first row ‘makes’ the pattern, the second row ‘copies’ it.

The colour indicated in the first and last squares of the row shows you which colour to use for these 2 rows. These first and last sts will always be a dc, worked into the last and first dc of the previous row. Always ch1 at the start of each row as your turning ch, this never counts as a st.

Each square represents a st in the row, which will be either a dc, an mtr, or a ch-sp in the first row of the colour. In the second row of the same colour, always work a dc into an mtr or dc from the first row, or make the same number of ch-sps as in the first row. 

When a square appears in the row which is a different colour from the colour in use, make a ch-sp to skip the st(s) below. To skip 1 st, ch2; to skip 2 sts, ch3; to skip 3 sts, ch4 and so on. This stops the work from pulling in. This ch-sp, made in both rows of the same colour, will be filled in later with an mtr worked in front of (or around) the 2 rows of ch into the skipped st(s) below.


And Finally...

PLEASE respect my work! Do not pass off this pattern as your own, sell it or generally abuse the freeness of it. And always give me credit for the design. It's a 2-way street isn't it? I give you free patterns, you give me respect! Thank you so much! Happy 2022 to you all, 

Esme xx


PS don't forget, if you have enjoyed this pattern and want to see more of my designs, my book Mosaic Crochet Workshop is out now, available everywhere! 


And I have lots of patterns on Etsy and Ravelry. Just search Red Sparrow Crochet!


Wednesday, 13 October 2021

Snaggletooth MAL Week 4 - The Final Week!


Well this is it, the final week of the Snaggletooth MAL! We made it to Week 4 and what an absolute blast of colourful fun it has been! Last week was totally excellent: I had no idea there were such strong feeling out there in the yarn community about whether to Tassel-Pompom-Or-Neither! The issue was debated passionately but good naturedly by Team Tassel, Team Pompom and Team Neither (I'm thinking maybe we could teach those politicians a thing or two... just saying)... If you want to catch up with links to join in the hot yarn topic of the day, I'll add them at the end of the post.

So, this week we'll be celebrating your finished masterpieces and I'll be showing you a couple of super-cute ideas too. But before all that, I'd like to say a huge thank you to Scheepjes for inviting me to collaborate with them on this MAL, and in particular to their INCREDIBLE team of Moderators who have offered endless advice, enthusiasm and joy to this project! Thank you!

As I mentioned last time, every Snaggletooth on every hook around the world makes me feel so happy, and I'd like to say thanks to everyone who joined in. I hope you are all enjoying this particular style of inset/2-row crochet that has stolen my heart. Here are just a few of the wonderful Snaggletooths I have spotted on the socials this week:


I love this gorgeous colour combination, with coordinating cushion, by Ruth Lambert @the.woolly.librarian on IG. She used Chunky Monkey and it looks stunning! (I'm rather keen on that chair too...)

Another Chunky Monkey Snaggletooth beauty, this time by Mimi @mimivclark on IG. That fresh yellow border just finishes it off perfectly. Definitely Team Pompom!


A very pretty version (love the styling too) by @tracy_jo18 on IG. Again, that edging just takes it to a new level of loveliness!

Niamh Holcroft's version on FB is made from 2 Whirls (Sea Breeze Tease), one worked from the outside, one from the inside. The result is magical wouldn't you agree?

Vera Hoefs on FB has used Colour Crafter for her Snaggletooth. I love her clever use  of complementary colours for the main throw, with that fun pop of pink on the border.


A classic houndstooth in black and white by Brigitte Culp on FB is brought to life with an amazing goldy-copper edging and fabulous pompoms!


Theresa Pearson on FB tried two different colours for the border... this stylish black one...
...and this popping fun pink one! Incredible how the edging can transform the look of the Snaggletooth pattern! (I love them both by the way, Theresa!!)
Some beautiful autumnal shades here by @richasmandmade on IG. I love the wide border and the beautiful houseplants too! 

Michelle Fedele-Turney on FB has made a beautiful version in Colour Crafter,  very much Team Pompom!


Look at this yarn shop window! Debby Spruitenburg's Colour Crafter version on FB is proudly on display in her yarn shop in Zoetermeer, Netherlands. 
 

Ineke Laagland on FB has made this very stylish Snaggletooth in Chunky Monkey. Those soft colours together are timeless and elegant. Team Tassel looking very good indeed!


Thank you as ever to everyone for permission to use your images.

Well, to wrap things up here in Snaggletooth Land, I thought we'd finish with a couple of extra projects, just in case you want to try out more ways of working this great pattern. Of course, I can't finish this MAL off without one more photo of the inspiration for the name Snaggletooth. Here he is, Mr Hank Deluxe, getting in the way of the crochet as ever:


What I made here is a baby Snaggletooth, worked in Scheepjes Metropolis (1 ball of each in Sevilla, Cota and Karachi) on a 3.5mm hook. I started with ch76 (which is calculated by using the starting chain multiple of (5 x 14 ch) + 6 ch.) I made seven repeats of the pattern, then not only added the dotty border to the top and bottom, but also to the sides too. This was so easy to do: once you have edged the two sides as explained in the pattern, you simply follow Rows 3-6 of the Top and Bottom Edging pattern, adjusting the final 'dot' at the end of Row 3 in order to finish the row correctly. 
The finished sample measured approximately 40 x 40cm, perfect for a cushion cover. You can either crochet a back panel, or do as I did and sew the crocheted front cover onto a piece of fabric cut to 42 x 42cm which gives you a 1cm seam allowance. 
And here it is, my finished Snaggletooth cushion!


Oh OK, just one more picture with Hank Deluxe. Guardian of the Snaggletooth. He really is such a massive show-off...


And the final Snaggletooth project before I go... some of you may have seen this on social media and I HAVE to share it! I cannot tell you how much I love it!!! If you are new to the tiny crocheted universe of Kwannie at @studiomanya then you really need to go and check out her work. She's amazing! Anyway, she took the Snaggletooth pattern and on a tiny hook (I think 1.25mm) and with Scheepjes Sweet Treat she made this TINY SNAGGLETOOTH to go with her tiny bed and tiny pillows and tiny bedside cabinet:


Isn't it just the sweetest Snaggletooth in the world? Doll's Houses have never looked so stylish! Thanks so much Kwannie, you blow me away with your incredible tiny work!

So there we are, thank you to you all for your lovely comments and enthusiasm for this MAL. I hope you have enjoyed this project as much as I have. If you'd like to try more designs by me, don't forget my new book Mosaic Crochet Workshop is out now from major and independant booksellers, full of fabulous designs using the same crochet method as Snaggletooth. And every single design and project in the book is made with Scheepjes yarn, because I love it all so much. Here are just a few of the many projects featured in the book:


Front cover shows Misty Mountains Throw.
Clockwise from Top Left: Dutch Houses Throw, YES Throw, Bumblebee Throw, Diamonds Throw.

If you want to see even more of my designs, head over to my Etsy shop HERE and Ravelry shop HERE for lots more pattern, colour and yarn!

Take care, keep safe, and happy crocheting, everyone!

Esme x

You can find the friendly Scheepjes Facebook community here:


and 


The Snaggletooth pattern is available as a paid pattern on Ravelry HERE but I am delighted to offer it to you as a free gift from me to you with the code ScheepjesMAL until 20 October when you check out on Ravelry. It is also available as a paid pattern only (not free) in my Etsy shop HERE.


PREVIOUS POSTS

Over and out xx


Wednesday, 6 October 2021

Snaggletooth MAL Week 3

Hi there Snaggletoothers! Welcome to Week 3 of the Snaggletooth Make Along, which I am delighted to be running with Scheepjes.


Well, it's been quite a Snaggletooth week! Over 4500 of you have downloaded the free pattern, and lots of you have been kind enough to purchase it, so I thank you ALL for joining in with this wonderful community project. This is my first MAL and you have made me feel very welcome! Yes, this week is about tassels and pompoms BUT before we get to that, there's important business to attend to: I have seen lots of colours flying around as you all discuss your fabulous projects. So it's time to sing your praises and showcase just a few of the Snaggletooth WIPs I have spotted on the socials. And just so you know, every single Snaggletooth being lovingly created out there makes me smile the biggest smile. Please keep on sharing your work! Next week as it's the final week of this MAL I'll be showing you some of the amazing finished Snaggletooths I have spotted already! (But please don't worry or stress that some are finished! This is definitely a project to take at your own pace... it's just that some people caught the Snaggletooth bug big time and couldn't put it down!)💖


Firstly, how about some sneaky Snaggletooth-at-work loveliness by Fiona @kellyskrochet76 in Chunky Monkey over on IG... 


... and check out the border colour she has chosen!! I am LOVING that lime!


Ellie Frances on Facebook... well and truly in team Chunky Monkey, and I cannot wait to see that gorgeous red border go on! 


Sunshine Snaggles! These gorgeous happy colours are by Michael @mikescreatievewereld on IG


This beautiful version is by Vickie Lack on Facebook, who is using Our Tribe in shade Felted Button for the Snaggles


Sabrina Krüger on Facebook is using these joyful Colour Crafter shades for her background- Brugge and Wolvega looking fab!


Kristin @_koalacrochet_ on IG has chosen Whirl and Whirlette for her Snaggletooth, this is going to look sublime when it's finished!


Lovely colour changes in Colour Crafter by Julie @pinkfearn on IG


Caroline over at @poppyseedandpom on IG is using the original Snaggletooth pink which is Colour Crafter Hilversum! I LOVE it!


Thank you to everyone for permission to use your pics, I appreciate it 💖

Before we start, here are some useful links if you need to catch up:
If you'd like to participate, you will find lots of help, support and chat over at the Scheepjes Facebook community here:


and 


where we will be sharing our work, and chatting about all things Snaggletooth.

The Snaggletooth pattern is available as a paid pattern on Ravelry HERE but I am delighted to offer it to you as a free gift from me to you with the code ScheepjesMAL for the duration of the MAL when you check out on Ravelry. It is also available as a paid pattern only (not free) in my Etsy shop HERE.

...And just so no one misses any Snaggletooth news, here's the itinerary:
PREVIOUS POSTS
UPCOMING POST
Week 4 (13 Oct): Wrapping up the MAL and celebrating your makes!

Anyways, I could literally spend all day gazing upon all your beautiful Snaggletooths but it's time to get on with some work! This week it's all about... Tassels and Pompoms! I know! If you've seen any of my designs before, you may have noticed I have a bit of a penchant for these fun and frivolous adornments...


Images top to bottom: Leafy Throw, Fool's Gold Throw (available on Etsy and Ravelry), YES Throw and Into The Trees Throw (both available in my book Mosaic Crochet Workshop)


As ever, you know this is entirely up to you, whether you want to tassel, or pompom, or neither. It's a personal choice. But I'm going to give you an easy step by step tutorial here, just in case you need a bit of guidance.

First up: HOW TO MAKE A POMPOM

First rule of pompoms, NO-ONE likes a sad, thin, miserly little pompom. No! We are aiming for full-bodied, voluptuous balls of fluffy goodness here.


YOU WILL NEED

A 65mm pompom maker (or size of your choice) or 2 circles of card, cut out of something like a cereal packet. 

Yarn of your choice

Sharp scissors


To use the pompom maker, open out both sides of the 'arms'. Then wrap the yarn around each side in turn, until each half is really full and plump.


 I aim to just about be able to push the arms back into their places; if they can be pushed in too easily then you probably haven't wrapped enough yarn around.


Push the two arms back to make a circle again, then CAREFULLY cut around the outside edge of all the yarn strands with sharp scissors. Do not open the arms yet!!


Once you have cut around the entire pompom maker, take 2 long lengths of yarn (double stranded is better as it needs to be strong) and tie them around the pompom maker, pulling tight so they slot into the groove which runs around the outside edge. Pull the yarn VERY VERY tight and tie a triple knot to secure. If you don't, your pompom may explode into a yarny cloud of nothingness! 


Leave the tying yarn long to fasten the pompom on to your blanket. Carefully open up the two sides of the arms of the pompom maker, then gently pull the two halves apart from the centre, leaving a fluffy pompom.


I like to give the pompom a quick haircut to tidy it up. And there 
it is!


To make a pompom out of cardboard rings, first place them together, then wind the yarn round both rings, through the hole in the centre. You will have to wind smallish balls of yarn to fit through the hole!


Then simply follow all the stages for the pompom maker above from where you start to cut round the yarn, making sure the scissors slide in between the two cardboard rings as a guide. Tie off as before, then finally remove the rings.


HOW TO MAKE A TASSEL


YOU WILL NEED

A piece of card, roughly cut to the length of you finished tassel. For Snaggletooth in Chunky Monkey, my piece of card measured 11cm long (or you could use a book, your mobile phone, anything which is the right length)

Yarn of your choice

Sharp scissors


First, wind the yarn neatly around the card and cut off. For the Chunky Monkey Snaggletooth, I wound the yarn 15 times around the card. Next cut 2 lengths of yarn each 30cm long.


Insert one of the 30cm lengths of yarn under all the loops at the top and knot it securely in the middle to fasten it.

Cut through all the loops along the bottom edge to make the tassels. Don't worry if they are not perfectly even at this point. Now tie the other 30cm length of yarn around all the strands (except the joining yarn at the top), approximately 3cm from the top.


Finally, trim the strands along the bottom edge to get them nice and even.


Now attach the tassels at regular intervals along each short end, using the joining yarn at the top to tie them on securely, before weaving in the joining yarn ends. For my Chunky Monkey throw, I made 26 tassels in total, 13 for each end. They were placed approximately every 9cm along each short edge, roughly every fifth 'dot' in Yarn A on the edging. Make sure you lay them all out to get the placing correct before attaching them.


So there you have it! Two easy ways to add fun and texture to your Snaggletooth loveliness, should you wish to. I hope you have enjoyed my mini photo tutorials this week.


Next week is the final week of this MAL, I am enjoying it so much and hope you are too. 

Coming up next time: We'll be taking a look at some more of your fantastic Snaggletooth versions, and I will be showing you a couple more fantastic project ideas... (Watch out, one of them is literally too cute!!!) 


See you next week,

Esme x