Monday, 17 February 2020

Emma's Throw now in Spanish!

Hi everyone! I am so thrilled to announce my free Emma's Throw pattern is now here in Spanish! Muchas gracias to the wonderful Ramona from @atelierriv for all her hard work and kindness. So, here we are, Manta Emma en español!


Hola amantes de las lanas! Os traigo un patron gratuito! Se trata de una manta realizada con cuadrados bastante simples que he hecho para el cumpleaños de mi querida hermana Emma hace unas semanas. A Emma le encantó y como ha recibido tanta apreciación el las redes socials he decidido escribir el patron y compartirlo con todos vosotros gratuitamente. Por que soy así de simpatica! Estoy disfrutando mucho regalando a las personas queridas un objeto hecho a mano, asia que vamos a darnos las manos y a sentir el amor compartido del crochet. Este puede ser un proyecto genial para gastar lanas variadas por que se puede usar cualquier lana DK. Os recomiendo bloquear los cuadrados antes de unirlos para que quede mejor. Este patrón en original usa terminos ingleses (UK). Si haces una manta y quieres compartir tu obra de arte, usa el hashtag #emmasthrow para que todos la podamos ver. 

Materiales necesarios:

- cualquier lana DK. Yo he usado Scheepjes Colour Crafter. Para cada cuadrado son necesarios aproximadamente 19 g de lana. Hacen falta 35 cuadrados (5x7).
- ganchillo de 5 mm, tijeras y aguja lanera

Tensión:
No es esencial para este proyecto.

Dimensiones:
Cada cuadrado mide aprox. 22 x 22 cm bloqueado.
La manta mide aprox. 118 x 162 cm después de añadir el borde.

Abreviaciones:
- cad – cadeneta
- pb – punto bajo
- pa – punto alto o vareta
- pad – punto alto doble
- pd – punto deslizado o raso
-V - vuelta

Empezamos haciendo 4 cad y un pd en la primera cad para formar un anillo, o hacer un anillo mágico.

V1: 3 cad (cuentan como 1 pa), 11 pa en el anillo, pd en la tercera cad inicial (Total 12 pa)

V2: 6 cad (cuentan como un pad y 2 cad), [1 pad en el siguiente punto, 2 cad] repetir hasta el final, pd en la cuarta cad del inicio (Total 12 pa y 12 espacios de 2 cad)

V3: (1 pb, 1 cad, 1 pa, 1 pad, 2 cad, 1 pad, 1 pa, 1 cad, 1 pa) en cada espacio de 2 cad hasta el fnal (Total 12 “pétalos”) Luego subir con pd por el lado del primer pétalo hasta la punta (hasta el espacio de 2 cad)

 V4: 5 cad, *(2 pa, 3 cad, 2pa) para formar la primera esquina, [5 cad, 1 pd en el espacio de 2 cad del siguiente pétalo] dos veces; repetir desde * 3 veces más, trabajando (1 pd, 5 cad) solo na vez en la última repetición. Pd en el primer espacio de 2 cad para unir. (Total 4 esquinas de (pa, 3 cad, pa) y 4 lados de 3 x (5 cad con 1 pd entre ellas)

V5:  1 pd en el primer espacio de 5 cad, 3 ca (cuentan como 1 pa) y 4 pa en el mismo espacio, *1 pa en cada uno de los siguientes 2 pa, (2 pa, 3 cad, 2 pa) en el siguiente espacio de 3 cad (esquina), 1 pa en cada uno de los siguientes 2 pa, (5 pa en el siguiente espacio de 5 cad) 3 veces; repetir desde * 3 veces más, trabajando (5 pa en el siguiente espacio de 5 cad) solo 2 veces en la última repetición, pd en la tercera cad del inicio (Total 19 pa por cada lado y 4 esquinas de (2pa, 3 cad, 2 pa).
V6: 4 cad (cuentan como 1 pa y 1 cad), *salta siguiente punto, (1pa en el siguiente punto, 1 cad, salta siguiente punto) hasta el último punto antes del espacio de 3 cad, 1 pa en el último punto, (2pa, 3cad, 2pa) en el espacio de 3cad (esquina), 1 pa en el siguiente punto, 1 cad; repetir desde * hasta el final, trabajando 1 pd en la tercera cad del inicio (Total 12 pa por cada lado con un espacio de 1 cad entre ellos, y 4 esquinas de (2pa, 3cad, 2pa)

V7: 3cad, *hacer 1pa en cada espacio de 1cad y en cada pa hasta el espacio de 3 cad, (2pa, 3cad, 2pa) en el espacio de 3cad (esquina); repetir desde* hasta el final, pd en la tercera cad del inicio (Total 27 pa por cada lado y 4 esquinas de (2pa, 3cad, 2pa)

V8  1 cad, 1 pb en el mismo punto, *1 pb en cada punto hasta el espacio de 3cad, (2pb, 2cad, 2pb) en el espacio de 3 cad de la esquina; repetir desde * hasta el final, pd en la cad inicial. 8Total 31 pb por cada lado con 4 esquinas de (2pb, 2cad, 2pb).

Corta el hilo y esconde los cabos.

Como unir los cuadrados
Una vez bloqueados los cuadrados, únelos con tu método preferido. Yo los he unido situando dos cuadrados con los lados del derecho enfrentados y he hecho puntos bajos cogiendo solo las hebras de atrás. En las esquinas he puesto solo un pb.

Borde
Por supuesto puedes usar el borde que prefieras. Yo he trabajado una vuelta de 1 pa en cada punto con (2pa, 3 cad, 2pa) en cada esquina. Luego he repetido las vueltas 6 y 7 del patrón del cuadrado, ajustando según necesidades (ya lo sé, no es muy científico). En la vuelta final he hecho 1 pb en cada punto y cada pocos puntos he hecho un punto garbanzo [3 cad, (coge hebra, introduce el ganchillo en la primera cad y saca una hebra) 4 veces, coge hebra y saca por todos los lazos que tienes en el ganchillo, 1 cad, cierra con 1 pd en la primera cad].

….y ya está la manta acabada!

Espero que te guste este patrón. Por favor, respeta mi trabajo. No vendas este este patrón ni te atribuyes su autoría. Si compartes en las redes sociales este patrón  o fotos de la manta acabada, por favor, etiquétame.
¡Gracias!

Monday, 25 November 2019

Red Sparrow Stars... a free pattern

Ahhhh these stars are SO cute and SO quick and easy to hook up. Perfect for a little gift, maybe for a teacher, or make a few and string them together as Christmas bunting... I can't wait to see what you do with yours! Hope you like this free pattern, and if you do make some, use #redsparrowstars so we can all admire your starry delights.


You will need
You can use any yarn and any hook size for these stars. I used Scheepjes Catona, which is a beautifully soft and luxurious mercerised cotton yarn, and a 3.5mm crochet hook. But you could go big hook big yarn, or tiny hook tiny yarn, the choice is yours. Even a bit of sparkly yarn... how gorgeous would that be!


Tension
Precise tension is not critical for this project. 


Measurements
Finished star measures approximately 7cm diameter from point to point after starching/blocking.


UK abbreviations (US terms in brackets)
beg beginning
ch(s) chain(s)
ch-sp(s) chain space(s)
dc double crochet (US sc)
htr half treble crochet (US hdc)
ss slip stitch(es)
st(s) stitch(es)
tr treble crochet (US dc)


Instructions


Star
Ch4, ss into first ch to join into a ring, or make a magic ring.
Round 1 Ch3 (counts as 1 tr), 11tr into ring, ss to beg ch-3 to join. [12 tr]
Round 2 Ch1 (does not count as st), 1dc in same st as join, 2dc in next st, (1dc in next st, 2dc in next st) to end, ss to first dc. [18 dc]
Round 3 *Ch5, work back down the ch as follows: skip ch nearest hook, 1ss in next ch, 1dc in next ch, 1htr in next ch, 1tr in next ch. Skip next 2 dc on ring, ss into next dc; rep from * 5 more times to make a 6-pointed star. Fasten off, weave in ends. [6 points of (5 ch, 1 ss, 1 dc, 1 htr, 1 tr)]


Hanging cord
With any contrast colour, ch12, ss into top of any point on star (being sure to insert hook under 2 loops of point to stop it pulling too loose), ch12, fasten off. Tie 2 loose ends together, just above the ends of the ch sts.


To Finish

Spray with starch solution or water, pull star into shape, ensuring points are super-pointy, press flat, leave to dry on a flat surface. Alternatively, mix a solution of 50% PVA glue and 50% water, dip star into this, gently squeeze out excess liquid, pull into shape as before and leave to dry on cling-film.

Tuesday, 19 November 2019

Emma's Throw- a free crochet pattern!


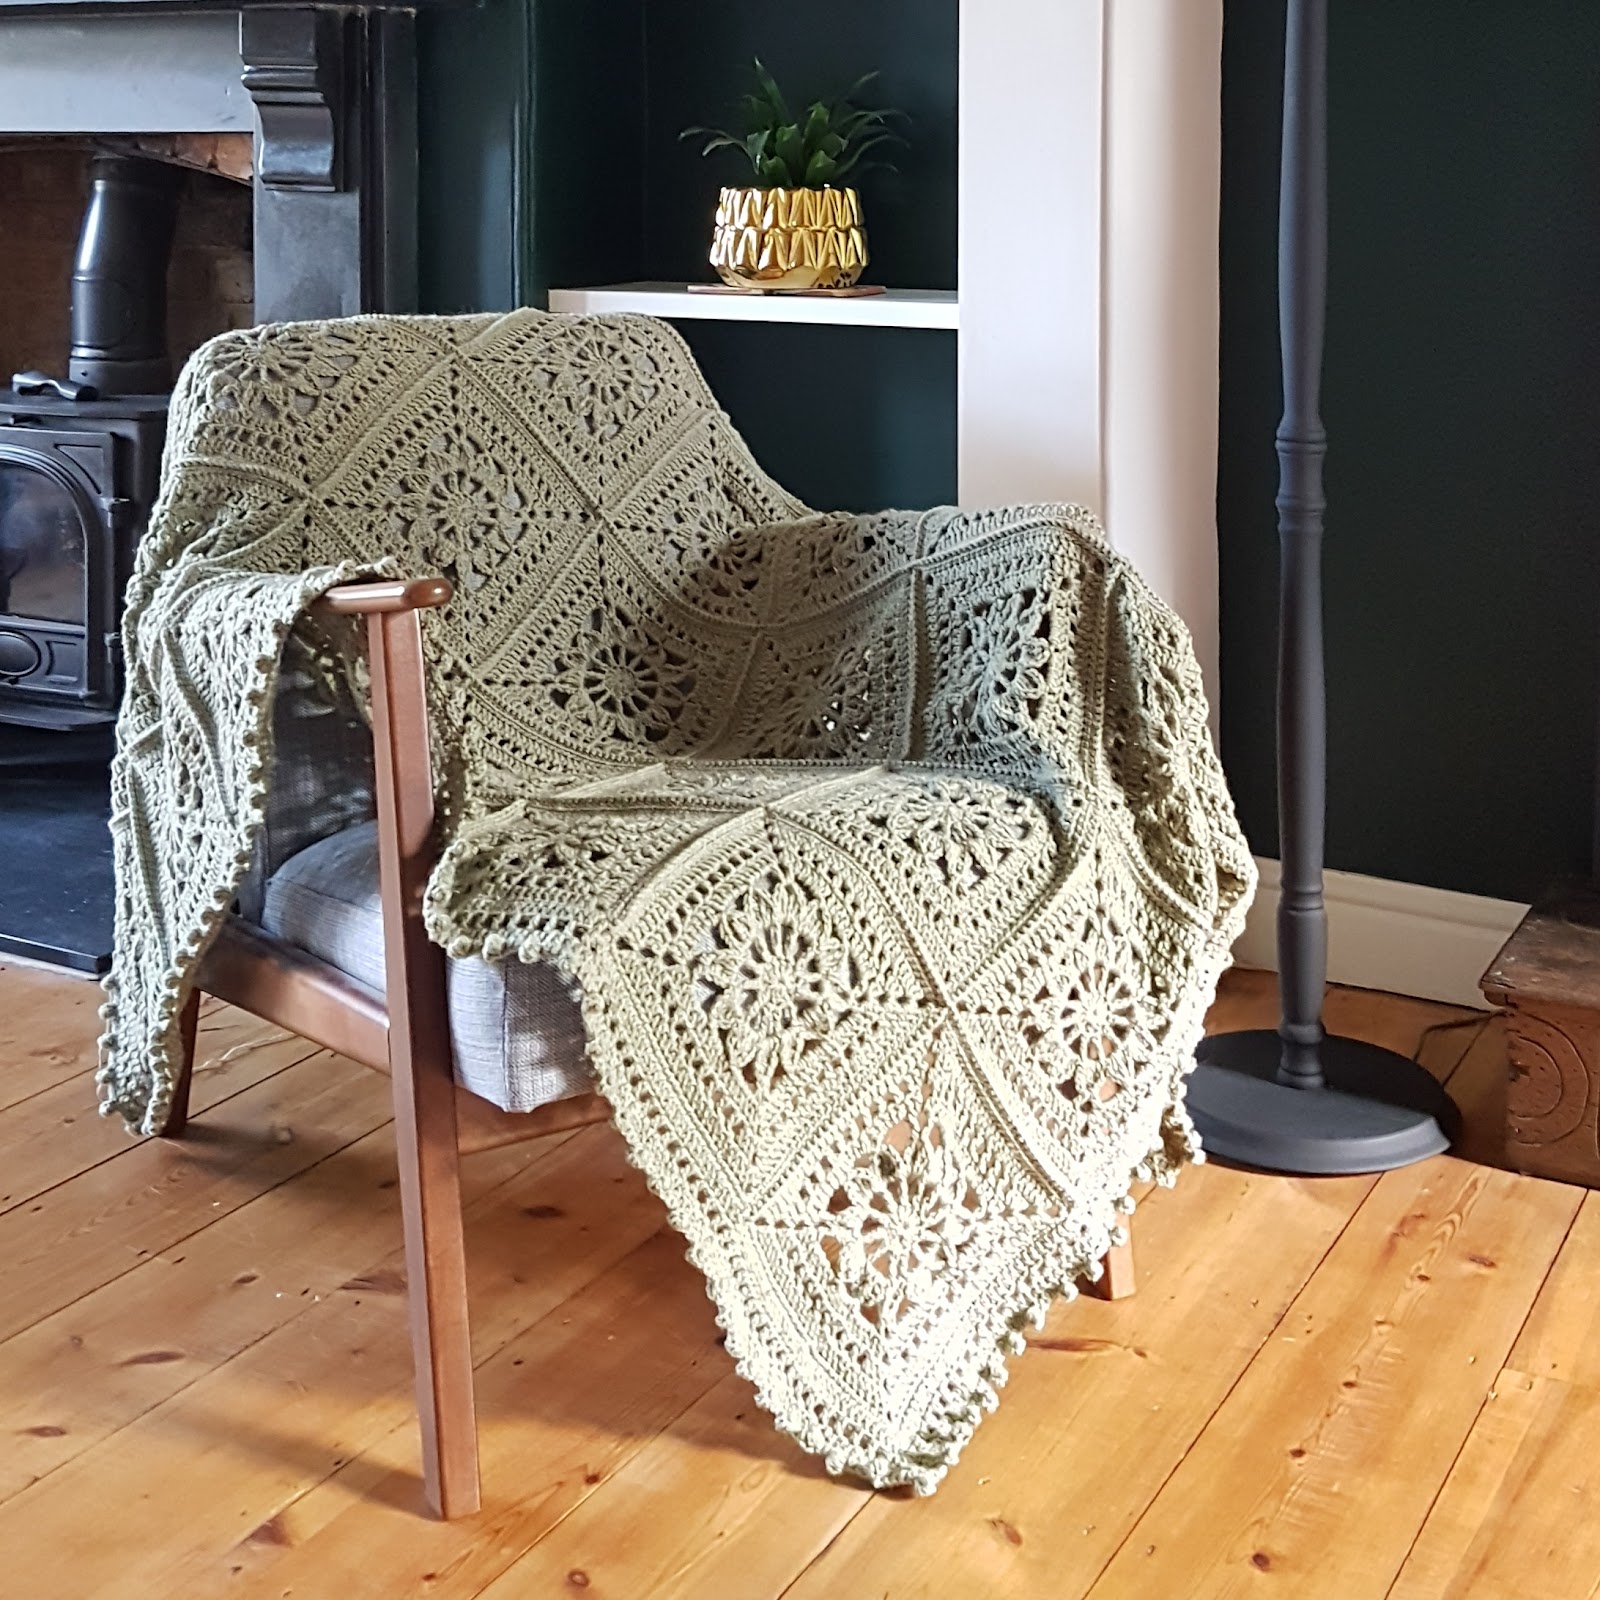
Hello, yarn lovers! Here's a free pattern for you! This is a simple motif-based throw I made for my lovely sister Emma’s birthday a few weeks ago. She really loved it, and it got so much love on the social medias that I decided to write it up for you all as a freebie. Cos I'm just so nice! I am still revelling in the warm glow which comes from giving a loved one a handmade gift, so let's all hold hands and feel the shared crochet love. It would be a great stash-busting project as any DK yarn can be used. I strongly recommend you block the squares before joining to make a nice crisp finish. This pattern uses UK crochet terms. If you do make one and want to share your masterpiece, use #emmasthrow so we can all admire! Happy crocheting!


You will need
You can use any DK yarn- I used Scheepjes Colour Crafter for my throw as it’s so soft and beautiful. Each square used approximately 19g of yarn; 35 squares were made, arranged 5 x 7 rows. 
A 5mm crochet hook


Tension
Precise tension is not critical for this project. 


Measurements
Finished square measures approximately 22 x 22cm over patt using a 5mm hook, after blocking.
Finished throw measures approximately 118 x 162cm once border is added.


UK abbreviations (US terms in brackets)
beg beginning
ch(s) chain(s)
ch-sp(s) chain space(s)
dc double crochet (US sc)
dtr double treble crochet (US tr)
RS right side
ss slip stitch(es)
st(s) stitch(es)
tr treble crochet (US dc)
yoh yarn over hook


Motif
Ch4, ss to first ch to join into a ring, or make a magic ring.
Round 1 Ch3 (counts as 1 tr throughout), 11tr into ring, ss to top of beg ch-3. [12 tr]
Round 2 Ch6 (counts as 1 dtr and 2 ch), (1dtr, ch2) in next tr and in each tr to end, ss to fourth ch of beg ch-6. [12 dtr, 12 ch-2 sps]
Round 3 (1dc, ch1, 1tr, 1dtr, ch2, 1dtr, 1tr, ch1, 1dc) in next ch-2 sp and in each ch-2 sp to end. [12 ‘petals’]
Note: To prepare for next round, ss into every st up side of first ‘petal’ into first ch-2 sp.
Round 4 Ch5, *(2tr, ch3, 2tr) in next ch-2 sp (corner made), ch5, (1ss in next ch-2 sp, ch5) twice; rep from * 3 more times, working (1ss, ch5) once instead of twice on last rep, ss into beg ch-2 sp to join. [4 corners of (2 tr, 3 ch, 2 tr), 4 sides of 3 x (5 ch with 1 ss between)]
Round 5 1ss into next ch-5 sp, ch3, 4tr in same sp (all worked around the ch, spread sts out evenly to fill ch-5 sp throughout), *1tr in each of next 2 tr, (2tr, ch3, 2tr) in next ch-3 sp (corner made), 1tr in each of next 2 tr, (5tr around next ch-5 sp) 3 times; rep from * 3 more times, working (5tr around next ch-5 sp) twice instead of 3 times on last rep, ss to top of beg ch-3. [19 tr per side, with 4 corners of (2 tr, 3 ch, 2 tr)]
Round 6 Ch4 (counts as 1 tr and 1 ch), *skip next st, (1tr in next st, ch1, skip next st) along to last tr before ch-3 sp, 1tr in last tr, (2tr, ch3, 2tr) in ch-3 sp (corner made), 1tr in next st, ch1; rep from * around to end, working 1ss into third ch of beg ch-4 on final rep. [12 tr per side with ch-1 sp in between, with 4 corners of (2 tr, 3 ch, 2 tr)]
Round 7 Ch3, *work 1tr in every ch-1 sp AND in every tr along to ch-3 sp, (2tr, ch3, 2tr) in ch-3 sp (corner made); rep from * around, working 1tr in every ch-1 sp and tr on final side as before to end, ss to top of beg ch-3. [27 tr per side, with 4 corners of (2 tr, 3 ch, 2 tr)]
Round 8 Ch1, 1dc in same st, *1dc in each st along to ch-3 sp, (2dc, ch2, 2dc) in ch-3 sp; rep from * around, working 1dc in every st on final side as before to end, ss to beg ch1. Fasten off, weave in ends. [31 dc per side, with 4 corners of (2 dc, 2 ch, 2 dc)]


Joining
Once you have blocked your motifs, join them together using your preferred method, either sewn with whip stitch, or crocheted together. I joined my throw by placing 2 squares together with RS facing out, and making dc sts into the back loops only of each st on both squares along the edge, then making 1dc into the corner spaces before adding the next 2 squares.


Border
Again, make the border as you wish. I worked one round of 1tr in each st with (2tr, ch3, 2tr) to make the four corners, followed by repeats of Rounds 6-7 of Motif to add interest, adjusting as necessary ( I know, not very scientific!) The final round was made up of 1dc in each st, with a bobble stitch made every few stitches as follows: ch3, (yoh, insert hook into first ch made and pull up a loop) 4 times, yoh, draw through all loops on hook, ch1, 1ss in first ch made to close st.

...and here's the finished throw. Ta-dah!


I hope you enjoy this pattern. Please respect my work. Do not sell this pattern or pass it off as your own as that infringes my Copyright. If you share this pattern or the finished throw, please give me full credit. Thanks!
A HUGE thank you to all my amazing testers out there, you're all wonderful. Thank you!
Esme xx


Saturday, 6 July 2019

Forest Shawl - a free pattern!


I appear have arrived in an amazing crafting community! How did this happen?! From being a slightly weirdo kid at school, I now find myself surrounded by beautiful people who are kind, creative, inclusive and just bloody LOVELY. Thank you! So much! As a little gesture of love to you all, here is my Forest Shawl pattern for you. It's one of my most loved designs ever, it's so simple and yet so effective, my favourite kind of crochet. Because deep down, in many respects, I'm a bit of a lazy-arse. A bit like Hank Deluxe. But he's a cat so he has the perfect excuse. Plus he has the advantage of not having to respond to household emergencies like dusty skirting boards. Lucky cat.


So, without further witterings, here's the pattern. Make it, share it, if you're a lazy-arse like me then get someone else to make it for you, it's there to be enjoyed.

I used gorgeous Scheepjes Catona 50g balls for my shawl, the colours are so rich and pure, I love this yarn. 
Yarn A: Forest Green (8 balls)
Yarn B: Spruce (1 ball for edging)

A 4mm hook is needed. UK crochet terms are used.

You'll need to make 42 hexagons, each one measures 15cm across widest point once blocked.

Your finished shawl will measure about 56 x 170cm, it's a lovely length, just right for over the shoulders on a cool evening.


Special stitches:
etr (extended treble):  Yoh, insert hook in next stitch or chain, yoh and pull up loop, yoh and draw through 1st loop on hook, (yarn over and draw through 2 loops) twice. 

Bobble stitch: Ch4, (yoh, insert hook into 3rd ch from hook, draw up loop) 6 times, draw hook through all loops on hook, ch1, sl st into 3rd ch again to close st.

Hexagon Pattern (make 42)
With Yarn A, ch3 and ss into first ch to make ring.
Round 1: Ch1, 6dc into ring, ss into first dc to join.
Round 2: Ch3 (counts as tr throughout), tr in same st as join, ch2, *2tr in next st, ch2; rep from * to end, ss into top of ch-3 to join (join in this way throughout).
Round 3: Ss into next tr, ch3, 3tr into ch-2 sp, ch3, *skip next tr, tr in next st, 3tr into ch-2 sp, ch3; rep from * to end, join.
Round 4: Ss into next tr, ch3, tr in each of next 2 sts, 3tr into ch-3 sp, ch4, *skip next tr, tr in each of next 3 sts, 3tr into ch-3 sp, ch4; rep from * to end, join.
Round 5: Ss into next tr, ch3, tr in each of next 4 sts, 3tr into ch-4 sp, ch5, *skip next tr, tr in each of next 5 sts, 3tr into ch-4 sp, ch5; rep from * to end, join.
Round 6: Ss into next tr, ch3, tr in each of next 6 sts, 3tr into ch-5 sp, ch6, *skip next tr, tr in each of next 7 sts, 3tr into ch-5 sp, ch6; rep from * to end, join. Fasten off yarn, weave in ends.
Block motifs before joining.


Joining (refer to Layout Chart):
Join motifs tog using Yarn A. Place 2 motifs RS together and whip stitch into back loops only along 1 side of tr sts. Do not join ch sts tog. Use running stitch along one chain to next row of tr sts and join to next motif as before.

Layout Chart


Edging:
Join Yarn B in any ch-6 sp on edge which forms an outward point (not where 2 motifs join.)
Round 1:  *(2dc, ch3, 2dc) in ch-6 sp, dc in each of next 3 tr along edge, htr in each of next 3 tr, tr in each of next 2 tr, etr (see Special Stitches) in each of next 2 sts, ch1, skip 2 x ch-6 sps where motifs join, etr in each of next 2 tr, tr in each of next 2 tr, htr in each of next 3 tr, dc in each of next 3 tr; rep from * around to end. Ss into first dc from start of round to join. (NB Work dc sts only between ch-6 sps on the sides indicated in red on Layout Chart).
Round 2: Ch1, dc in same st, dc in next st. *Dc into next ch-3 sp, make bobble (see Special Stitches), ch1, dc in same ch-3 sp, dc in each st to ch-1 sp, skip ch-1 sp, dc in each st to ch-3 sp; rep from * to end. (NB work bobbles into outer corners as indicated by red lines on Layout Chart). Fasten off yarn, weave in ends.

Block Forest Shawl to shape, then fling it on around your shoulders and listen to the gasps of admiration as you walk serenely and gracefully through the crowds. Or something like that. I like to flounce around in mine, a bit of dancing too when there's no one home, just me and the cat and Goat on the stereo... Enjoy your shawl! xxx Esme xxx


Tuesday, 21 May 2019

Come With Me On An Underwater Adventure...

Gosh, it's been a while since I last sat down to ramble on about recent crochet adventures. So much has been happening over the last few months, all of it exciting and challenging and thrilling and so on! And never far from a hook...

So, my main BIG news is that the wonderful YARN 7 by Scheepjes is out now, and it is an absolute underwater beauty... it's all about the Reef, and the entire bookazine explores this theme in such an inspiring way. There are 17 crochet and knitting patterns and a couple of fascinating Artist's profiles too... 


Here it is! Isn't it gorgeous? Don't even get me started on how lovely the texture of the paper is... I'll save that treat for another day ;) You can tell from the front cover that it's going to be fab-u-lous inside... so let's dive in and explore! 

First up, one of my absolute favourite patterns is this Kelp Forest Sweater by Ana D. Look at that stunning ripply seaweedy-kelpy pattern. So lovely. I'm always on the lookout for simply-styled, boxy crochet sweaters, and this is SO on my summer-make list. Ana's version is made in Scheepjes Secret Garden yarn which is pretty scrummy with its silk blend. I cannot be trusted with such fine yarn as no doubt I'll spill pasta sauce down it, so I'm going to try this pattern with a 100% cotton and see how I get on... will let you know...


So that's a very good start! Next up on our sub-aquatic journey is...oooh the Hydra Blanket by Mark Roseboom aka The Guy With the Hook. 


Now, I am usually a bit of a monochrome lover when it comes to home decor, but oh my lord SWOON massively big-time over this design. Mark has come up with this incredible swirling-water motif which just looks hypnotic. The yarn here is a mix of Scheepjes Stone Washed and River Washed (yes, I think he pretty much went for every colour!) and the end result is AMAYYYZING! Love it.

Swimming on a little further... Have your fingers turned to prunes yet? Sticking with the watery theme quite aptly I feel, I do not know what they put in the water in Gloucestershire where my Other Half's family come from. But whatever it is, it seems to produce girl babies. We now have 5 nieces over on that side of the country. 5 nieces and no nephews. Just girls. Fab girl gang. So, I got to thinking, maybe they'd like some cute little fish to play with... they could create their own aquarium actually there are so many of them... and what could be cuter than this Fantasy Clown Fish by Matt from A Boy And Bunting. The pattern is great because it gives different yarn suggestions to make big fish, little fish, any size of fish. Scheepjes Maxi Sweet Treat, Catona, Cahlista, anything goes.


...aaaaand finally, it was great for me to be involved in this beautiful bookazine in 2 ways... firstly, I jumped in (see, the theme just keeps on giving!) and worked as one of the text editors... wow, there's a steep but splendid learning curve I must say! OK, I crochet like an obsessive and I spent 16 years working as an English as a Foreign Language teacher, but still. Lots to learn. Still learning. Won't ever stop learning I think! What an opportunity Scheepjes gave me, how wonderful to be asked.
Secondly, my Pompom Ripple Wrap pattern features here too!


I absolutely love this pattern: it's an elongated half-moon shape in Scheepjes Colour Crafter. There was a lot of maths involved in this design to create the shape, maybe a bit of swearing over too many numbers, but in the end I'm so pleased with the simple black and white stripes, and of course the 25 pompoms just make it so fun. You can adapt this to make it less pompommy and more urban chic if you like- I actually made one in light and dark blue stripes with no pompoms and have lived in it ever since. It gets comments! If you make one, use #pompomripplewrap on the socials to share your colours and styling!

So, thanks for coming with me on this tail of fishy wonderment. OK, I'll stop now :)
You can buy this gorgeous bookazine from Wool Warehouse in the UK, or go to the Scheepjes website for outlets. xxx