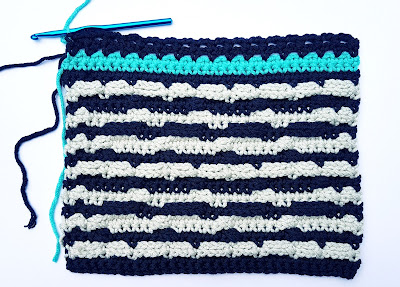
Hi there! Welcome to Week 2 of the Snaggletooth Make Along, which I am thrilled to be running with the wonderful Scheepjes team.
Yarn: Scheepjes Chunky Monkey (you can use any Scheepjes yarn and hook size of your choice, so long as the colours are contrasting to show the stitches clearly)
Yarn A: Slate
Yarn B: Stone
Yarn C: Aqua
6.5mm crochet hook
So, to edge my swatch, I'll be using Yarn C (the aqua blue) with some Yarn A (dark blue) to add a bit of interest.
Top Edging
We will start with the top edge, which we fastened off last time.
With RS facing, join Yarn C with a ss in the first st on the top edge.
Row 1 (RS) Ch1 (again, this never counts as a st), 1dc in each st to end, turn. [33 sts]
Row 2 (WS) Ch1, 1dc in each st to end, cc to Yarn A in final st, turn.
Row 3 (RS) Ch1, 1dc, *ch2, skip 1 st, 1dc; rep from * to end, turn.
Row 4 (WS) Ch1, 1dc, *ch2, skip ch-2 sp, 1dc; rep from * to end, cc to Yarn C in final st, turn.
Row 5 (RS) Ch1, 1dc, *1mtr, 1dc; rep from * to end, turn.
Row 6 (WS) Ch1, 1dc in each st to end.
Fasten off both yarns and weave in the ends.
Bottom Edging
Now we're going to edge the bottom edge in exactly the same way. You might remember last time I mentioned when we started the swatch to make Row 1 into the single back loop on the back of each chain? Well, this is where it pays off, as we work Row 1 of the Edging into each of the 33 chains of the starting chain. It just makes for a good edge, which looks like it's part of the design, not just an edge added on which it can do when working into a starting chain.
So, as before, with RS facing, join Yarn C with a ss into the first chain on the bottom edge, then follow the pattern as above.
Now we have a lovely top and bottom edging done, we need to edge the two 'raw' sides, where the yarn has been carried up every 2 rows. To be honest, on some designs I like to keep this visible but here we're going to cover up these sides.
Side Edging
Very simply, each side is edged with 2 rows of dc stitches in Yarn C. It makes a neat edge, as you work your dc stitches OVER ANY LOOSE LOOPS of yarn carried up the side of the work. The only issue is that getting your stitch count correct when working into the row-ends can be tricky. You want your work to lie flat, without rucking, or without being too tight. Some people choose a different hook size, some have a tried and tested 'formula' to get the drape just right.
So, with all that said, this is my formula, it may not work for you so feel free to work to your own, or have an experiment to see what works for you.
I always use the same size hook as for the main pattern.
First Side
With RS facing, join Yarn C with ss in first row-end on one side.
Row 1 (RS) Ch1, 1dc in same row-end as ss, 1dc in each of next 3 row-ends, *skip next row-end, 1dc in each of next 4 row-ends; rep from * to last 2 sts, skip next row-end, 1dc in each of last 2 row-ends, turn. [34 dc]
Row 2 (WS) Ch1, 1dc in each st to end. Fasten off.
Second Side
Repeat as for First Side.
Weave in all ends. Block as required. I never block my throws as I'm too lazy and I think they look good unblocked anyway!
So, that's it for this week. Hope you enjoyed getting some gorgeous edging on your Snaggletooth. Next week it's all about pompoms and tassels, so I'll see you then. Until next time, happy mosaic crocheting!
Esme x
PS Don't forget to share your pics, I'm so excited to see your colour choices! We'll take a look at some of your Snaggly works of art next week!


incredible
ReplyDelete